Do you need bulk price product update? This is too difficult if you have hundreds of product in your store. To do this task, FMEModules’s PrestaShop Bulk Product Price Update module is best helper. It allows to select the product categories and then go for updating them in few clicks. You have facility to update unit price, wholesale price or retail price.
For more help, watch the video
PrestaShop Store Design Service
Do you know the name of the most simple CMS cum shopping cart. It is PrestaShop as it offers the top features with simple backend. All can be done with little settings or configuration through backend. It does not need to have a coding knowledge to start a shop. Just in the case, if you are facing some issue in theme selection or the current available themes are not according to your need or desire, just give a call to us and we FMModules will be at your expense. We provide you best customization and development services to you.
For more details, visit our video here or visit PrestaShop Store Design Service.
Video
Private Shop for Prestashop
Private Shop for Prestashop Module is a tool to place a check on the entrance of your website. It helps to show a login form on the entrance. If there is already registered customers, they just need to login but in the case, if a visitor is not registered, he have to click on the signup form and fill in the registration form. When customer click on the next button after filling the form, an email will be sent to the admin who will approve or disapprove the registration.
View the video for more details.
Get it on addons marketplace here; PrestaShop Hide Shop

What Makes the Perfect Mobile Checkout Page?
Mobile phones have become an important part of everyday lives. They are the epitome of human engineering in one compressed device. Not only do they allow us to communicate all over the world, they can be used to connect to the internet for online shopping.
There has been a sharp increase in the number of mobile customers in the past few years. Such has been their numbers that it is important to consider mobile users whenever designing a checkout page. Optimizing the page to best serve their devices is essential to convert mobile leads into sales.
Why should mobile users be considered separately?
According to different surveys, 71 to 81 percent customers prefer using mobile checkouts for online sales. Considering how adaptable and portable mobiles are, it is easy to see why customers choose to purchase through them when on the move.
Mobile users are fast about their business and if handled correctly, they purchase products relatively quick. This makes them valuable leads because they are guaranteed to purchase with the right tactics.
With technology shifting every day, users are getting more and more dependent on mobiles and usually switch to mobiles if they have to make an online purchase because they are interactive platforms and many sites have optimized themselves to serve them.
5 Factors that make the best Mobile Checkout
So what is the perfect Mobile Checkout Page made up of? To get a good understanding, let us take a look at the factors that contribute towards an impressive mobile checkout.
One of the most important factors is the simplification of the checkout process by replacing multiple checkout pages with a single step, for which, we recommend PrestaShop One Page Checkout module. It allows the customers to fill the details at once and save their valuable time.
Let us take a look at some of the most critical aspect that constitutes a customer friendly and successful checkout page:
1. Keep relevant information
Most checkout pages have a host of unwanted information and unrelated issues on them. This puts off a customer whole prime goal is to purchase product with ease. The PrestaShop One Step checkout solves this issue by keeping required information to a bare minimum and supplying the customer with a smooth, unhindered experience.
Customers are 30 percent more likely to result in Cart abandonment if their experience in sharing information is not well taken care of. Fields such as these are prime examples of how checkout pages are ruined:
- 2nd addresses
- 2nd telephone numbers
- Separate field for same category of data e.g. first, middle and last name.
Interactive and adaptable checkouts such as PrestaShop One Step Checkout are designed to counter such redundancy. They combine such data under one field when presenting such as a single address, contact number, etc. This permits presentation of only necessary fields which the customers highly appreciate.
2. Remove necessity for Account Creation
What is the biggest turn off for customers? Once they have successfully entered all information in checkout page, the site prompts them to create a separate account to continue purchase. 83 percent customers bluntly stated that they were not only forced to abandon cart but were never again going to return to the site to purchase product.
Having a smart checkout page is critical to avoid such mistakes. PrestaShop One Page Checkout is revolutionary in this sense, since it simply links existing social media accounts with the individual purchasing product. Not only this, but it promotes business because it allows customers to leave positive feedback and reviews about the site on their accounts.
3. Let the Online Transaction Services do their thing
It has grown to be an old and redundant habit to ask for addresses and financial history from customers to initiate sale. Instead of relying on these old methods, simply allow Google Wallet, PayPal and Amazon to directly handle requests to minimize hassle.
PrestaShop One Page checkout functions in the same way, skipping the lengthy process of personally taking information and then sending it to service providers. The client is simply directed towards the service providers to whom they give information. Not only does it boost customer confidence to give their private data to those organizations they initially shared it with but it streamlines the overall process and speed as well.
4. Security that your customer needs
Checkout pages store some very sensitive information which if stolen can jeopardize the lives of customers and a singular data theft can bring entire organizations to their knees. Keeping in mind such, it is important to reassure the customer that the private data (name, address, credit card numbers, pins) are all being transferred to a safe location and will be unreachable by cyber criminals.
A good way to convince is to display satisfied organizations, various security certificates and encryption strengths so that even layman customers can understand that the organizations is a trustworthy one.
By choosing to directly call in service providers to take information, phishing attacks are avoided and encryption levels are increased as these sites take serious care of customer data.
5. Optimize loading speed
It doesn’t matter if you have a well-designed site if it takes ages for it to load. Statistically, 74 percent visitors will abandon site if it takes more than 5 seconds for it to load. It gets more complicated at the checkout, where customers are more cautious about sites that take too long to load.
PrestaShop One Page checkout is lightweight and designed keeping in mind optimum performance and efficiency, which makes it highly versatile for such matters. The One Step format eliminates loading entirely for new pages, securing the deal in one go. This makes it perfect for fast paced mobile applications.
6. Choose One Page Checkout for best results
Having the right shopping cart such as PrestaShop One Page checkout is the key to conversions. Having leads turn into customers and clientele can only be achieved by facilitating the checkout process so that they are able to purchase product with ease and efficiency. The right shopping cart can boost online webpage businesses and generate profits and at the same time enhance customer shopping experience, guaranteeing they will be back to purchase again.
Author Bio: Alastair Brian writer from “FMEModules” – a brand well known for top of the line reliable PrestaShop Add-ons, themes, extensions and services. Follow him on Twitter, LinkedIn.
How to Show Pre Order Status Available in PrestaShop? – User Guide
You want to sell a new product in your store then the most important thing that you want to know about the market demand for those products. For this purpose, you can start a survey, send email to your existing customers or have some other options. All these options are fine but why not go for a more simple solution?
Best Solution to Know the Market Demand
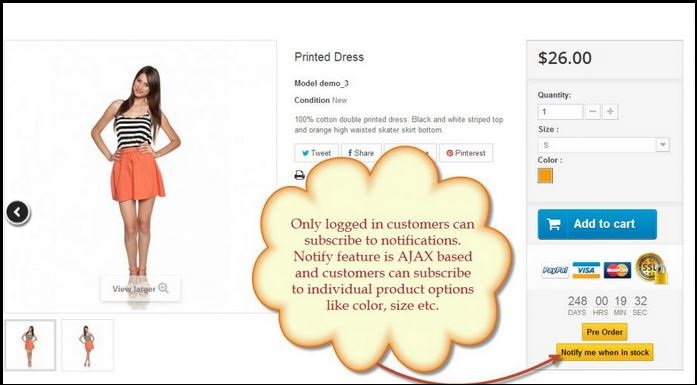
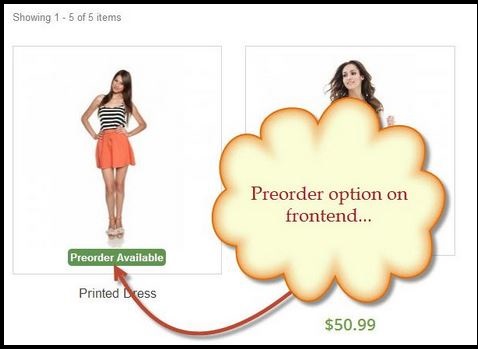
Here we are giving the simplest way to know the demand. The plan is to show a “preorder available for this product” on item’s image at product and category pages. Further, give some options to the interested visitors such that they can subscribe/preorder the purchasing product and you can judge the expected demand through the no. of preorders.
Allow the customers to preorder according to different product attributes will further tell you that in which color or size, a particular product is needed.
The advantage of the preorder feature is not limited to it. Since you can also show preorder status for out of stock products by which you can get manufacturing cost of products from customers.
How to Create Preorder and Waiting List Button in PrestaShop?
If you’re a developer, then go ahead with the tip and create a preorder and waitlist button on product pages and show them on images. But if you’re not technical or want to do it simply, you can use preorder module that gives exactly the same functionality as given in the last paragraph.
How to Use Preorder Module by FMEModules?
Given below a user guide to use this preorder module on your store;
Step 1: Go to your PrestaShop Backend, upload and install the zip file of this preorder and waiting list module.
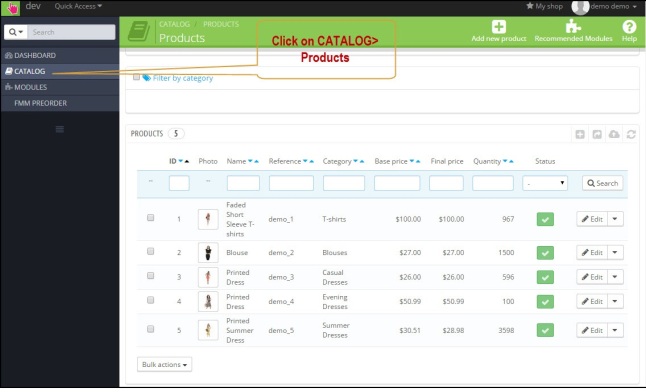
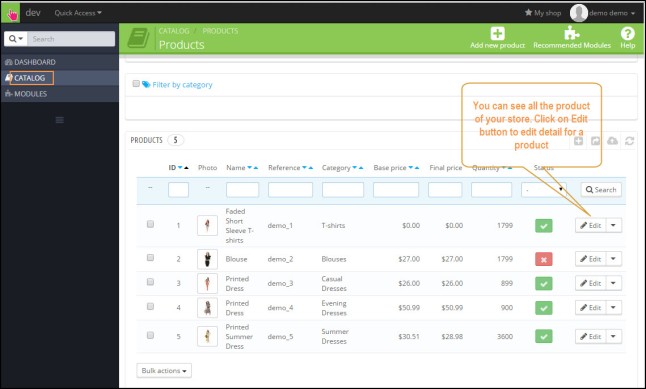
Step 2: From the backend, go to CATALOG>PRODUCTS and click on any product for which you want to allow pre-order.
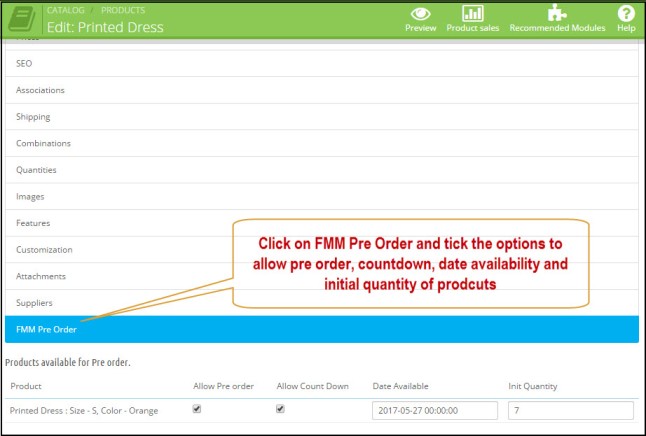
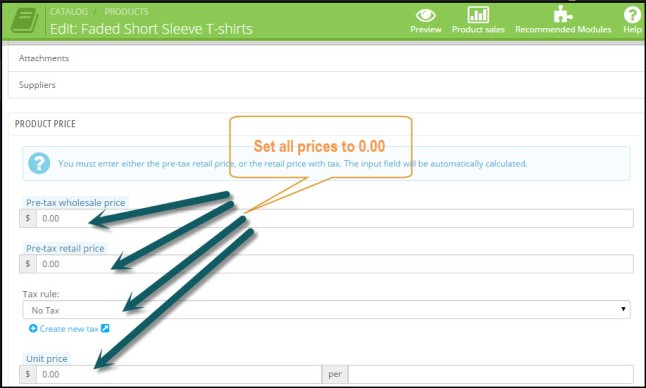
Step 3: In product detail page, go to FMM Preorder Section and set allow preorder, date availability and other options and click on save.
Admin Settings from Backend
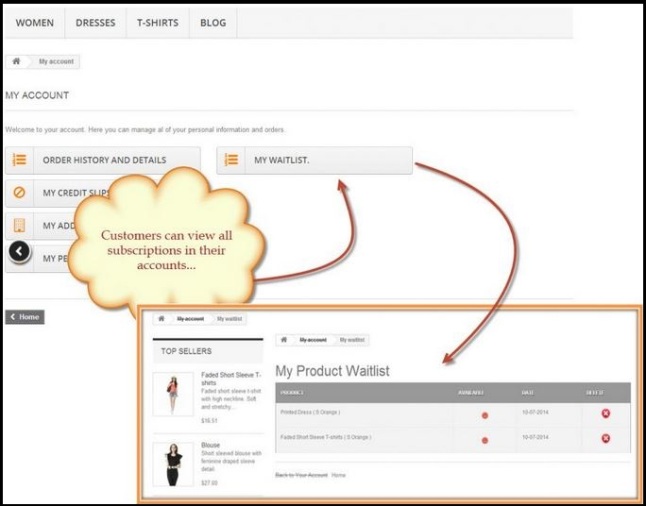
From backend, go to FMM PREORDER waiting list where you can see all the order received from the customers.
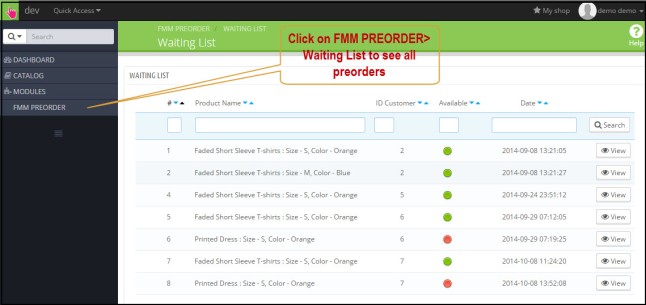
Click on any preorder to see more details which include product name, customer id, customer first name, 2nd name, email, and if notification email is sent or not(represented by red, green light).

How to Test this PrestaShop Waiting List Module?
Go to the backend, and enable preorders for some of your products, now go to frontend and see that if the preorder button and waiting list button are available on the product page. Register on the demo site as a customer and click on preorder and waitlist button on the product page. Go to your customer account and see where you can see the preorder details (as the customer).
This Module will be a useful addition to your PrestaShop Store.
Prestashop pre order module is also available on Prestashop Addons.

How to Show Home Page Testimonials in PrestaShop? – User Guide
You have probably seen lot of PrestaShop ecommerce store that shows their customer testimonials at home page footer. These reviews are quite helpful to convince the new customers’ right at the first page. The problem that we are addressing today is that you can’t show lot of testimonials there because it will slow down the speed of your whole site.
Then what to do?
Only show 2, 3 reviews. No way!
Because greater the number the testimonials greater the chances of sales. We are not saying that add infinite reviews. You just need to show appropriate number of feedback e.g. maximum 10 to 15.

Solution
In this case, you can make a separate page (shown in main menu) on your home page that will directs to separate landing page of reviews where new customers can see the reviews topic wise e.g. reviews for whole site, reviews for custom support and services, reviews for products etc.
Adding a new cms page in PrestaShop is just easy from the store backend but here the aim is to show testimonials in most presentable way. For this purpose plug-in like Advance testimonials is quite helpful to manage and show customer testimonials in an effective way.
Some Must Have features for Testimonials Page
The testimonial should have following features;
- Read more button in case of lengthy testimonial
- Limit the no. of testimonials on single page
- Allow to submit new testimonials
- Testimonials slider block
- Testimonials rate and reviews feature
- Testimonial reply or comment
- Image of customer with testimonial
- Admin defined user groups who can post testimonials
- Email settings for testimonial moderation
- Smooth layout of testimonial page
Given below a user guide for this PrestaShop advance testimonials module
User Guide
At the backend, there are two types of settings involved;
- Module Configuration Settings
- Manage Testimonial settings
We will go through here from both setting.
Module Configuration Settings
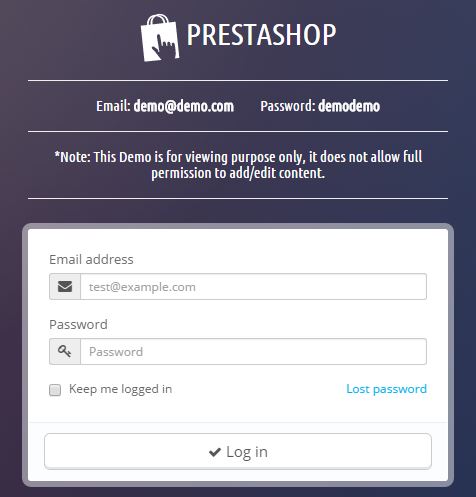
Step 1: Go to backend of the demo and fill in the credentials seen at the demo page.
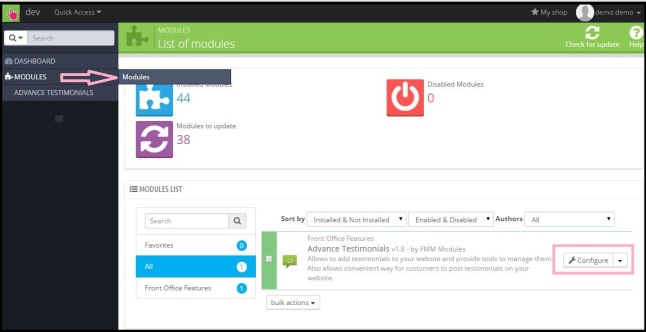
Step 2: Go to MODULES>modules and search for Product Testimonials by FMM Modules. Click on module configuration.
Step 3: On the configuration page, you will see 8 different sections. Go to each section one by one.
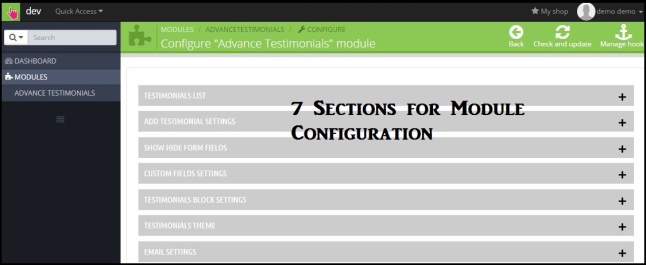
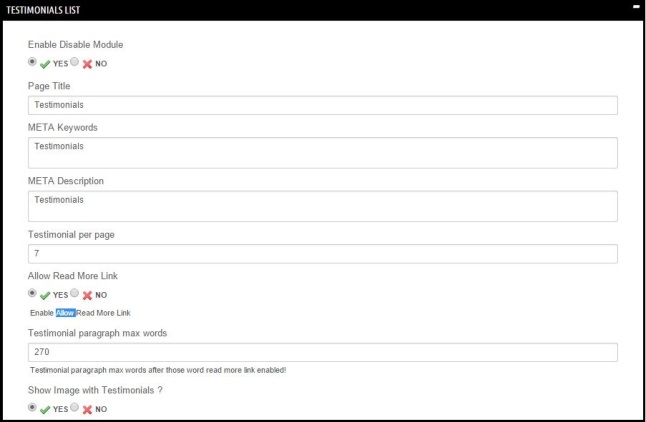
Testimonial List
From here you can enable/disable module, sort reviews, set title, meta and enable/disable read more link. These are general settings.
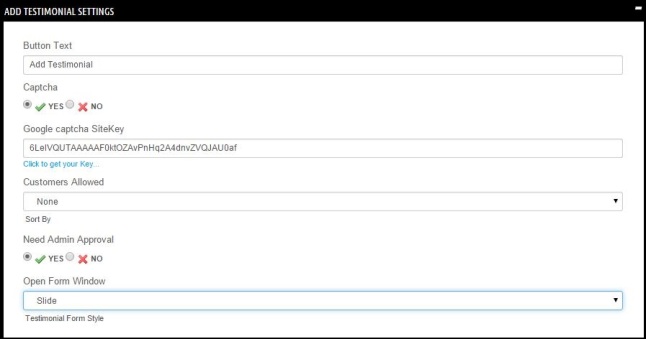
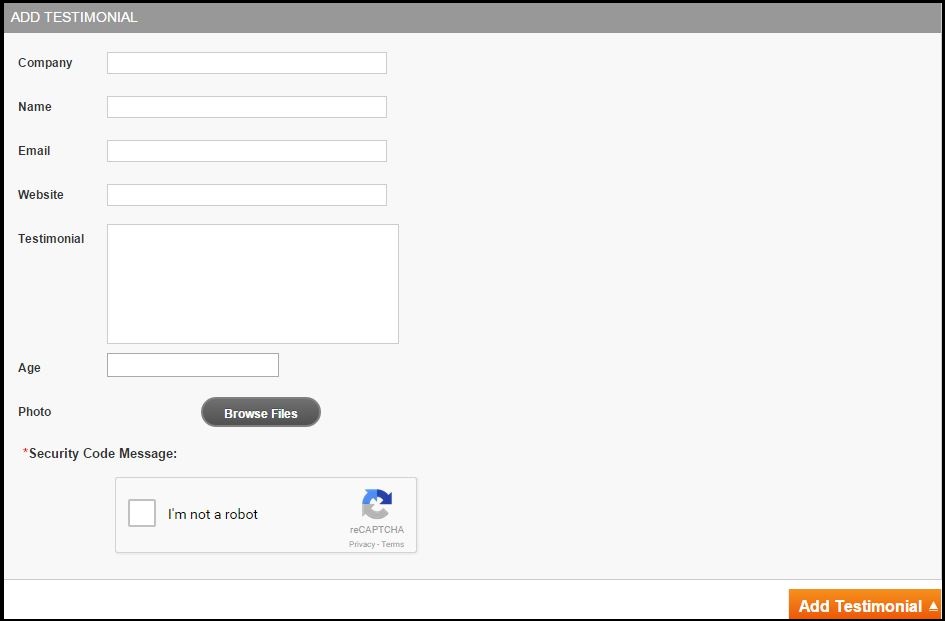
Add Testimonials Settings
From here you can set the Add testimonials button label, enable/disable Captcha, allow/disallow user groups for posting reviews, enable/disable admin approval for new testimonials.
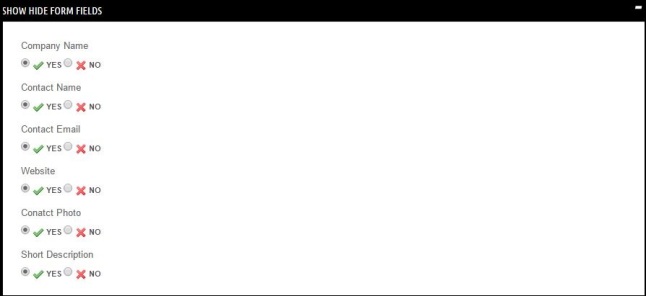
Show Hide Form Fields
From here, admin can allow to show/hide fields for add testimonial form.
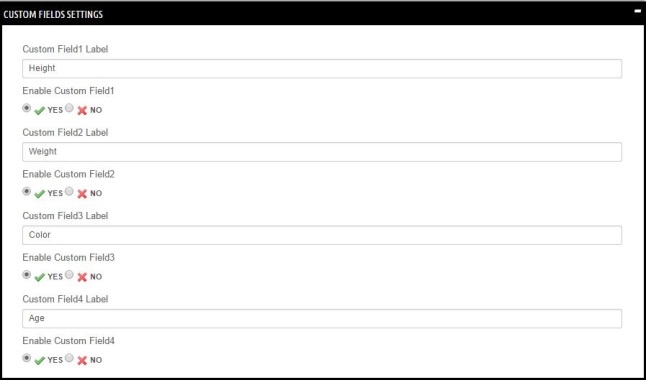
Custom fields
From here, admin can add/edit extra fields on add testimonial form.
Testimonials Block Settings
From here, admin can do testimonials block settings like block type, title, number of testimonials, read more link, slider effect, slider timeout etc.

Testimonials Theme
You can set different type of themes for testimonials section landing page.

Email Settings
From here, admin can set email notification for new testimonials. Set admin email, email sender name, and subject.

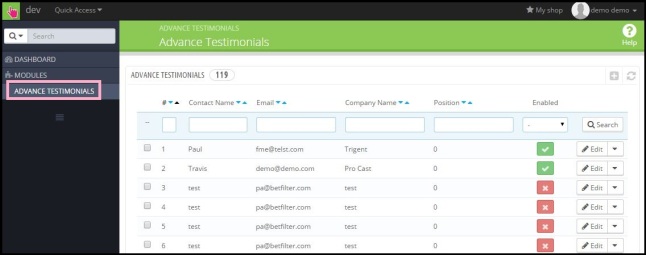
Manage Testimonial settings
At PrestaShop dashboard, go to ADVANCE TESTIMONIALS>manage testimonial where you can see and manage all testimonials. You can also create new testimonial by your own in case, customers have given reviews through some other platform and you want to show them here on product page.
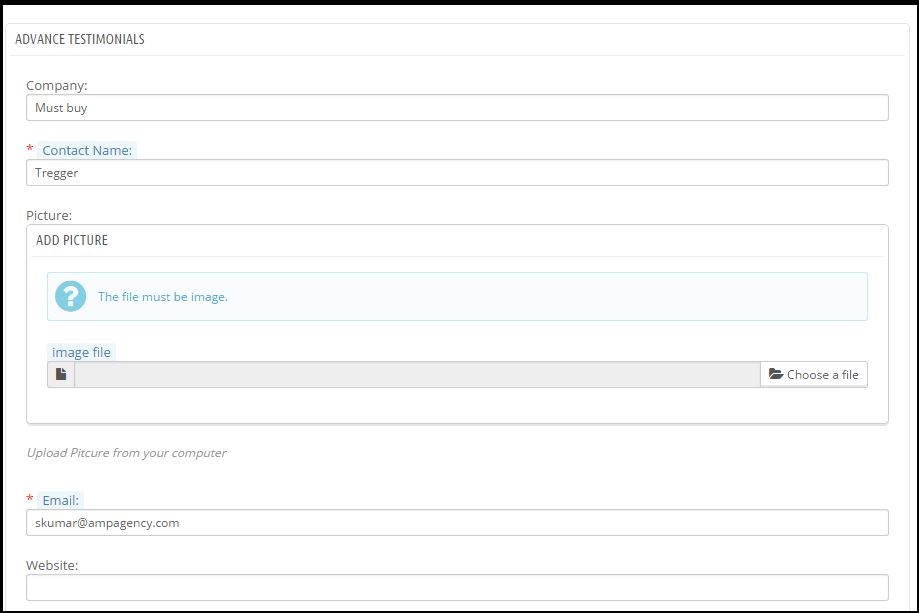
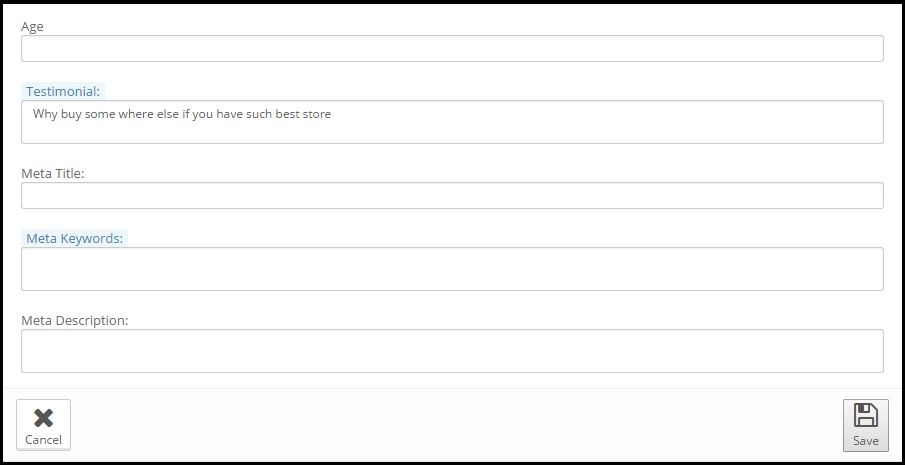
New Testimonial Page Settings
You can edit following settings for testimonials as given in the images here.
Fronted Display
Go to frontend demo where you can see product page testimonials, listing page for testimonials and add a testimonial form respectively.
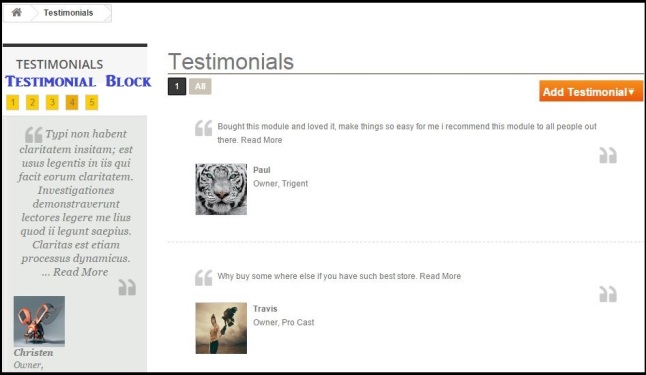
Users can add new testimonials by clicking Add Testimonials Button
Summary
If you’re a business starter and want to stabilize the business, get positive reviews from your current customers and became a successful seller.
How to Calculate Prices of Variable Sized Products in PrestaShop? – User Guide
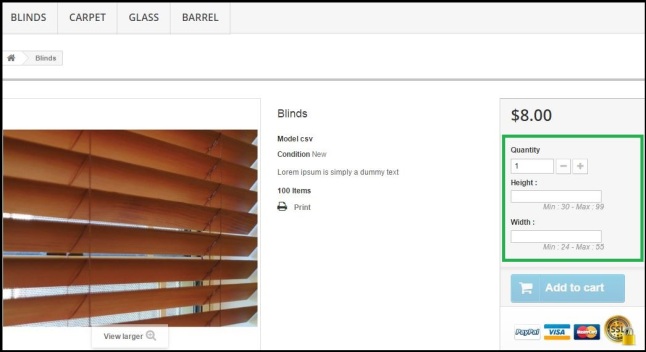
One of our client David Milosz who sells liquids, canvas, banners, fabric, blinds, barrels etc on his PrestaShop store came to us with the problem that his clients call him to know the prices of products. It was quite a big headache for him to deal with them all.
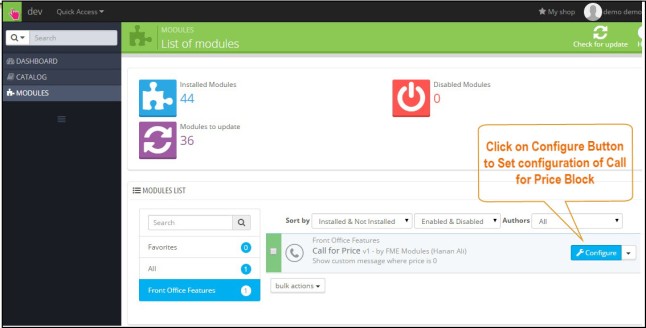
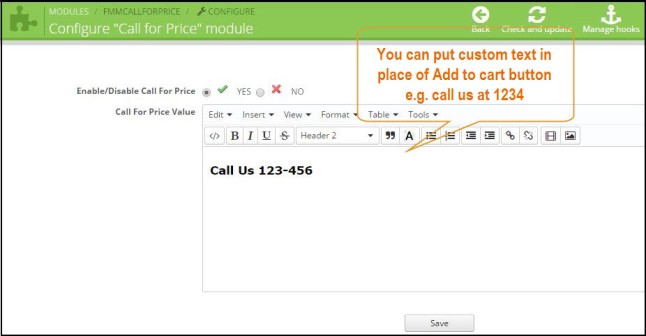
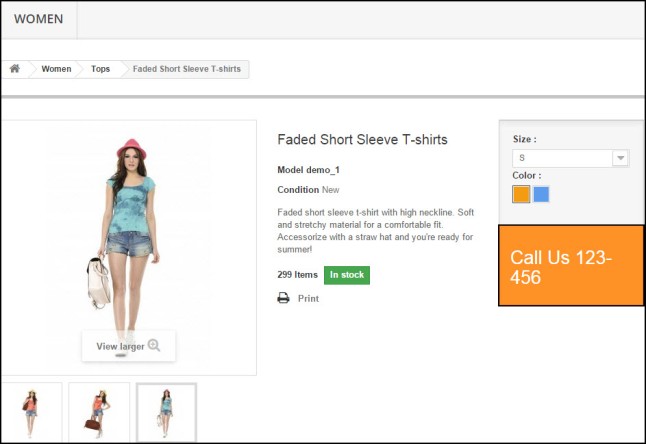
This was a real problem since there is no direct way to show prices of variable sized products as they vary with changing dimensions heights, length, width etc. He was hiding the price of product and adds to cart button using call for price plugin and in place he was displaying a custom text “Call for Price at 1234”. Whenever users want to buy anything, they call to him to know the prices for different sizes of the products.

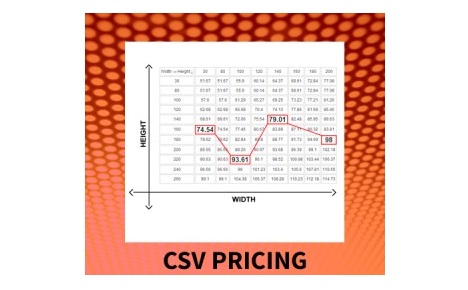
Solution to Calculate Prices of Variable Sized Products
We decided to address this problem and developed a CSV pricing extension for him which has made the pricing calculation really simple. All he needs to make a csv file comprising of different sized combinations. He then uploaded the file with his products and now when a customer enters a length and width, system scans the csv file combination and displays it on front page within seconds.
Given below a quick user guide to know that how this canvas pricing PrestaShop works;
User Guide
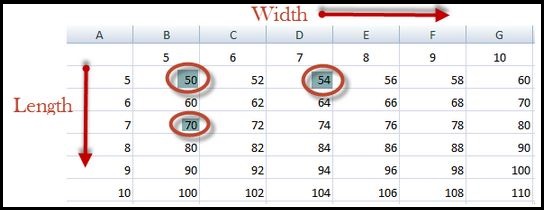
Step 1: Create a new csv file contains different combination of length and widths according to your need.
Step 2: After installation of this module, go to dashboard and then Go to CSV Pricing Menu in left column.
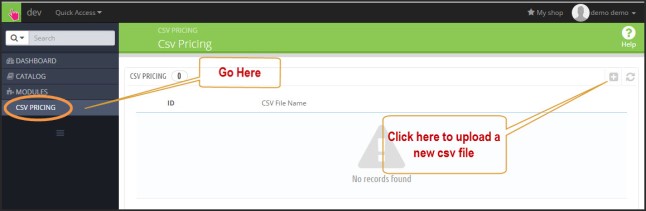
Step 3: Click on + button to upload csv file which will open a window to upload csv file.
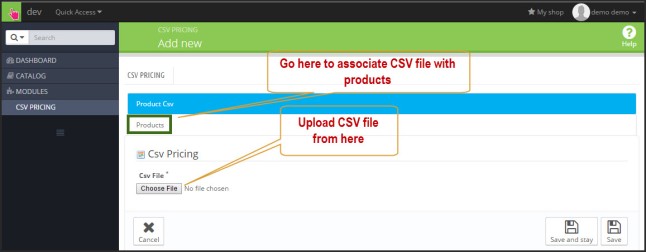
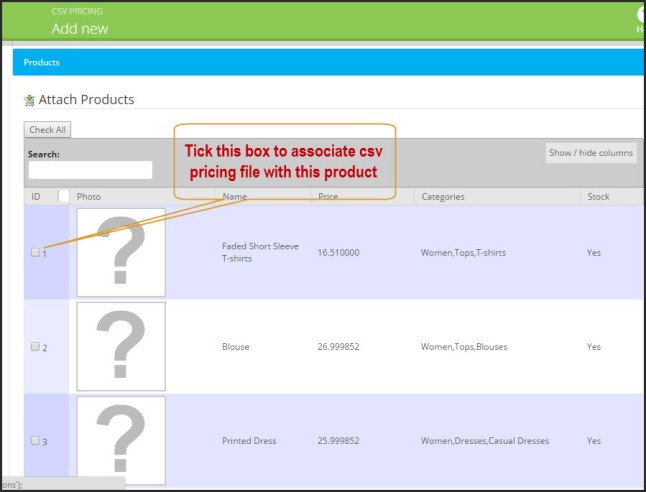
Step 4: From the same window, go to Product from where you can associate csv file with products.
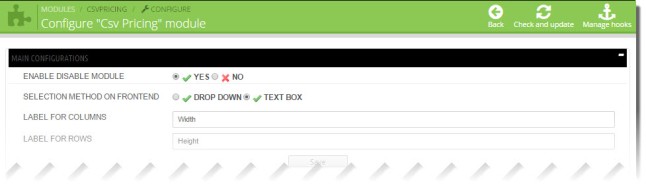
General Settings
At the store backend, go to MODULES>Modules and search for CSV Pricing by FMEModules. Click on configure button.
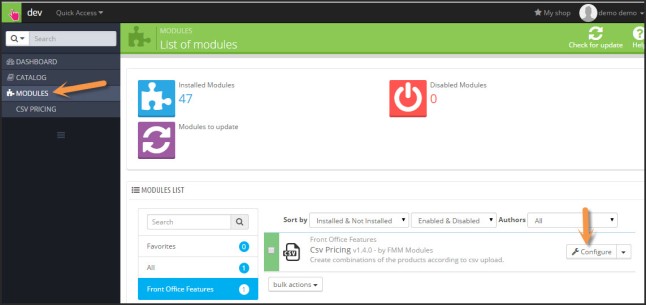
From the configuration window you can enable/disable module, select method of drop down/text box. Set the labels for column and rows at front end.
How to Test the blind pricing PrestaShop Module?
Make a new csv file, upload it from the store backend, associate the file with products and then look at the front end of those products where you can see the pricing calculation using CSV file.
Advantage
PrestaShop barrel pricing module provides you a way to save a lot of your time and energy for dealing the customers. Customers will also fell satisfaction by using this great feature.


How to Clean PrestaShop URLs using Pretty URLs Module? – User Guide
It is quite clear fact that Google likes those websites and activities that are liked by the internet searchers and vice versa. It means that Google ranks those sites better that are more user friendly including their urls and content and overall browsing experience.

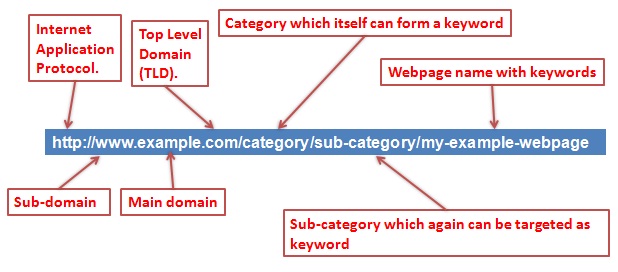
In today’s post, we will explain that which url structure is good for PrestaShop stores. By default, PrestaShop urls contains Ids, numbers and tags that are considered ugly by Google as they are not according to Google guidelines. This reason is just as explained in the first paragraph i.e. these urls are not most relevant to customers query. On the other side, clean urls exhibits category, sub category and products in an organized way without ids, so Google likely to rank them better in SERPs.
Ugly URL: http://www.myprestashop.com/product.php?id_product=27
Pretty URL: http://www.myprestashop.com/music-players/ipod-nano-green
How to Clean PrestaShop URLs from useless information?
By default PrestaShop has option to clean urls at store backend i.e. Preferences -> SEO and URLs. Turing it on makes the urls clean but it still contains ids that must be removed so that urls become completely pretty. For this purpose, FMEModules has developed Pretty Urls Plugin that has ability to remove the ids automatically and redirect the urls permanently to new clean address.
How to Clean Urls using Pretty URLs Module?
Given here a user guide to use this Pretty URLs Module on your PrestaShop store;
This seo url PrestaShop module automatically removes the ids, number and tags from the ursl once installed on a PrestaShop store. But keep in mind that this plugin cleans only product urls, for cleaning CMS page urls of your store, you can do it manually through backend following the given steps;
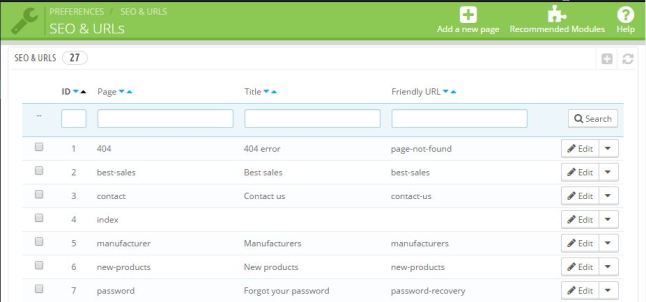
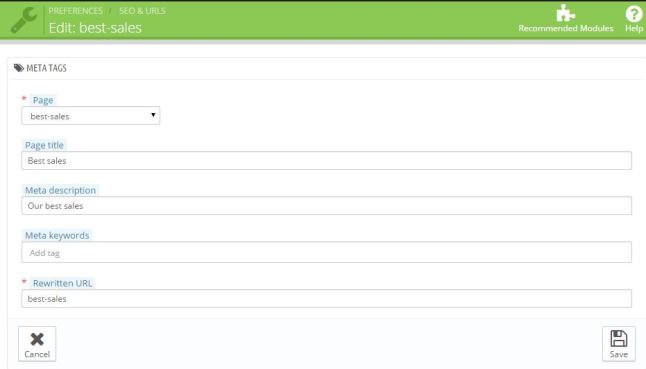
Page by Page URLs Settings
Go to backend of your Store and PREFERENCES>SEO and URLs where you will find different pages of your store. You can edit/rewrite their urls as shown in figure.
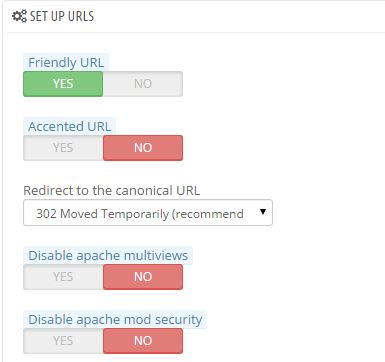
General Settings
Turn on friendly urls and turn off accented urls. Here accented urls means that either special characters are allowed to appear here or not.
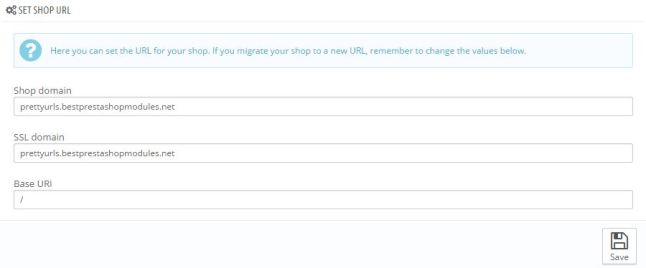
Set Shop URL
You can set shop domain, ssl domain and base url here.
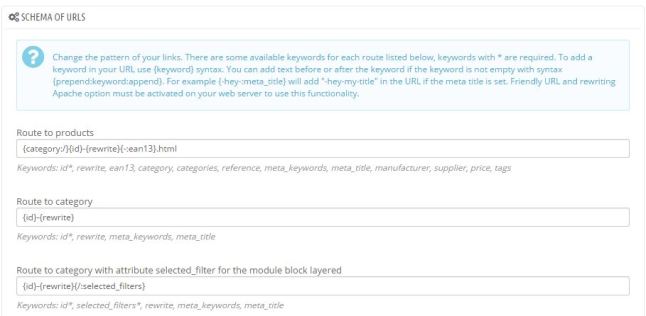
Schema of urls
You can set the scheme of urls here as shown.
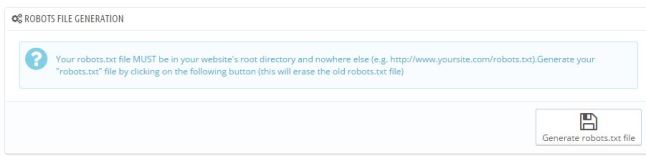
Robots file generation
You can generate robot.txt file from here.
Forethought
PrestaShop url id remover is quite an amazing plugin that automatically turns the urls to pretty free form ids.

How to Show Call Back Form in PrestaShop? – User Guide
When a customer visits your store and wants to buy some products from, it is natural that they have some queries about the products. Customer can only take the decision of buying when all the queries and confusions are well addressed by the merchant.

Now the question arises that how customer can get answer of his queries. There are certains ways of doing that for a PrestaShop store like
- Read the product faq
- Submit the query by mail
- Live chat
All the methods are fine upto their functionality but why not go for an advanced technique. Go for such system on your store that enables the customers to chat with you through phone.
What are limitations for contact through Phone?
Time synchronization is biggest problem when admin or customers call each other for getting information. May be when the admin call, the customers may be buys in some other activates like lunch, meeting, journey etc. If this thing is addressed, contact through phone will be most effective way of communication.
“FMEModules” has developed a PrestaShop Call Back Plugin which addressed this issue very well. This plugin provides a call back form on front end of PrestaShop store that have necessary fields of Name, phone number and time of availability for call. The 3rd field is most necessary field because it has removed the time synchronization issue between customer and merchant.
Given below a quick user guide to use this module on your store;
User Guide
Module Configuration
Step 1: Go to backend demo of the module and fill in the credentials.
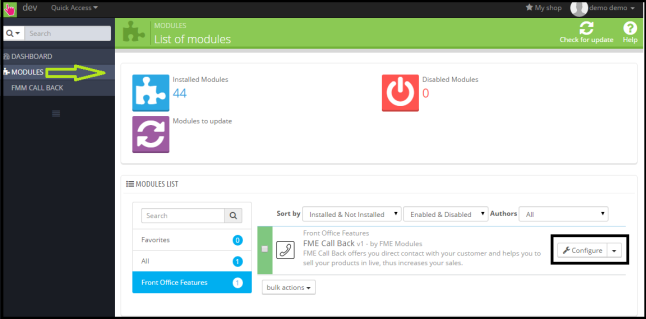
Step 2: Go to MODULES>modules and search for FME Call Back by FMEModules and click on configure.
Step 3: On the module configuration page, fill the necessary fields like email of admin, enable/disable module, and send email notification enable/disable, position of call back form, upload image for agent who call the customer, enable/disable image and text to display at frontend.
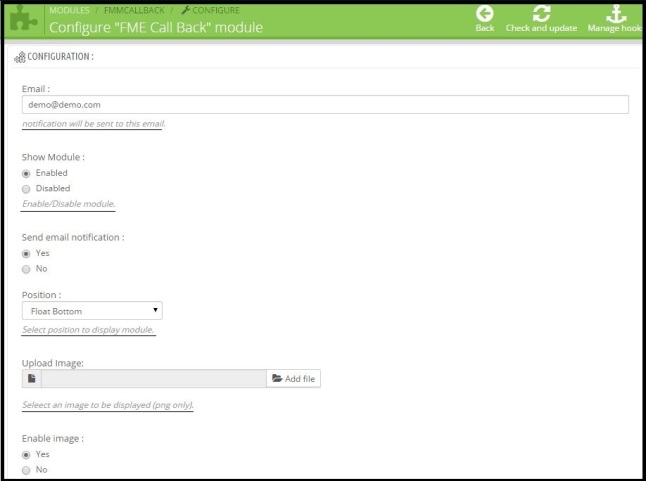
Finally click on save button.
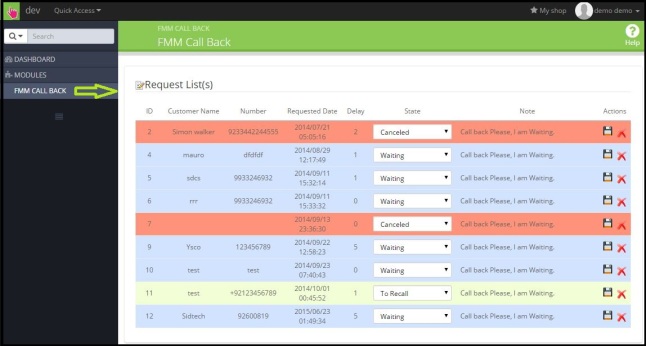
You can see all the call requests in dashboard under FMM CALL BACK in the main menu. For each call request admin can see ID, customer name, number, Requested Date, delay, State, note.
Admin can set the state of each call back request and add a note, clicking on save will save the ticket status and note.
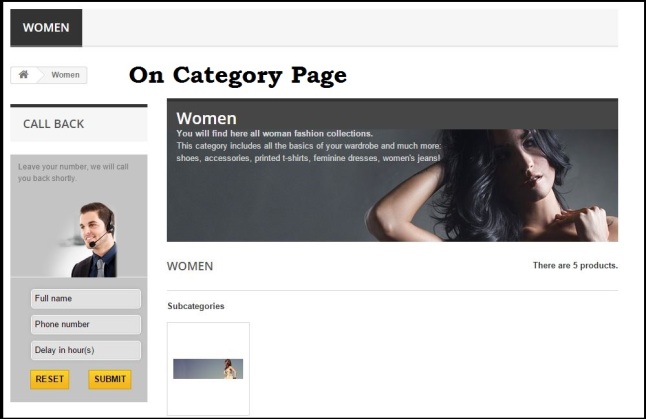
Frontend Demo
At the front-end home and category pages, you can see a call back form through which your customer sends call requests to you.

How to Test Module PrestaShop We Call You Back Module
Go to frontend of the module and submit a call back request through the form provided on home and category page. Fill your name, phone number and delay in hours and submit. Now go to your email where you can see that a call back request is received (admin email for notification can be configured from backend). Also at the backend you can see the submitted call back request under the FMM CALL BACK section. You can further set the status of call back request and internal note.
Summary
If customer’s queries are addressed in an effective way then getting more sales in possible is just simple. So use this PrestaShop request callback module and remove the communication gap between you and your customers.
